
Wall shadow
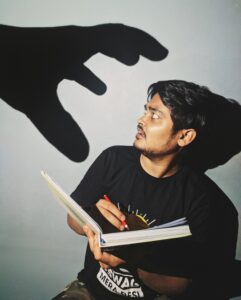
While most photography is about capturing light, the niche practice of shadow photography uses the absence of light to create sharp contrast and make interesting focal points in photos.
Creating shadow photos is a relatively simple process, and you can easily DIY it with a low-tech set up. All you need is a hard key light, a backlight like a quasar or a similar softer light, a backdrop, and a big ol’ box of objects that can create weird shadows. You can find these kinds of objects anywhere, from your kitchen to your attic. Just look for interesting patterns in the shadow when you hold the object up to a light source. Some of the things I used were colanders, wicker baskets, and film strips.
Lighting Apertures
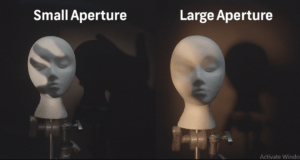
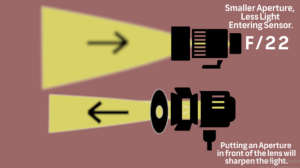
You might run into the problem of the light creating soft shapes instead of the hard light you want. It seems to bend around the holes in the object, creating diffuse light on your subject. This problem can be attributed to the aperture of your light source. Think of camera aperture: when you want a sharp image with no soft edges, you close your aperture to one of the smallest settings. The same goes for light aperture. In this instance, you want to limit the amount of light being emitted to create a harder, more defined light. This results in a starker shadow when the light shines through your object of choice.
Most lights won’t actually come with an aperture for adjusting light distribution. The only ones that are widely available are Leko lights, used mainly as spotlights in event production and theater. Even so, when I first started using the Leko I was still getting soft shadows from our objects.
After a bit of troubleshooting, I found that I needed to reverse the aperture effect by switching the pinhole location to the front side of the lens, not the internal side.
We even found that if you change the shape of your light’s aperture, you get the same shape in your shadows, even if it passes through a secondary hole. You can do this with your own light by creating your own cardboard aperture sheets to place in front of your light. Just be sure to place them a safe distance away from your light source to prevent a fire hazard.

Once you’ve completed your studio set-up, get creative with your shots. Change up the angle of the light, the angle of your subject, or the type of object you are using to get that shadow. Experimentation is the best way to get your most creative shot. If the shadow object is in your photo, don’t fret. If you are shooting on a black background, you can easily use Photoshop to edit it out.
